Firing Methods | Part one
Making and Firing a Mokume Mini Kiln
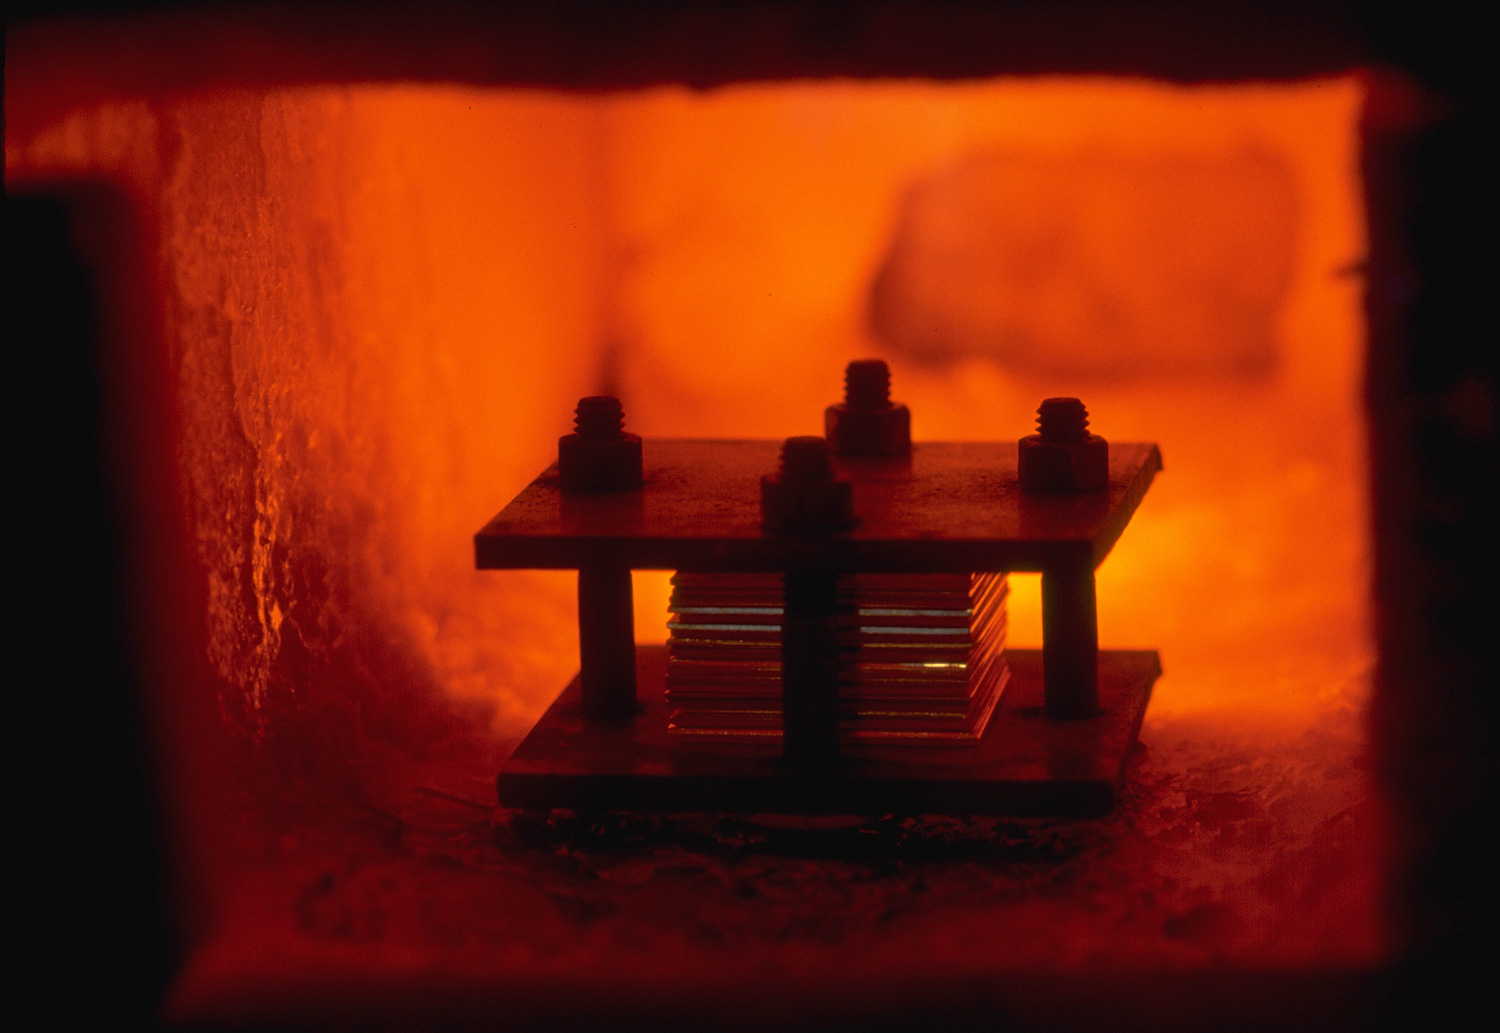
photo: TTU Photo Services
“I use the same propane-fired forge for forge-welding steel and for mokume gane. It offers consistent heat and a controlled atmosphere.”
Methods for Laminating Mokume Gane Billets

This section of the book will cover the specific bonding methods developed and used by Robert Coogan, James Binnion and myself. These procedures cover a wide range of firing techniques, and all have been used successfully by us and our many students. Your own work style, experience, and equipment will determine which one suits you best. I encourage you to try them all, if you can, and to use the information presented here to formulate your own method, customized to suit your particular needs.
To expedite your success, a detailed log of how you prepare and fire each billet — whatever methods you use, and especially as you experiment with several — is essential. This is a link to a PDF file of the firing log record that I use, and you are welcome to use it.
Making a Mokume Mini Kiln
First I want to cover the construction of the simple mini-kiln, which I designed for laminating mokume billets used in smaller-scale work. It is easy to make, and up until this past year, I used this type of kiln exclusively for the production of my line of mokume wedding bands. Although the chamber is small, it is capable of firing gold billets weighing up to 10 ounces, and is plenty big enough to make sheet for modest hollowware projects or knives.
Firing the eutectic mini kiln.
One of the most critical issues that we have to deal with when producing quality mokume gane is the ability of many hot metals to absorb oxygen and form oxides on and below their surfaces. This firescale severely disrupts proper bonding, and unless the causes of this are eliminated, it is impossible to make a billet that will withstand the stresses of rolling and patterning.
The early Japanese swordsmiths solved this oxidation problem by heating their billets in a blacksmith’s forge, which, by its very nature, provides a reducing, or oxygen-starved atmosphere. This worked well for them because they already had the forge and it was an easy way of heating the large billets of copper-based alloys that they usually made. However, most of us do not have access to blacksmith’s forges, nor do we need to create such large quantities of precious-metal mokume for our purposes. Considering the above, this very naturally points us towards the use of a small kiln.
Gas-fired kilns provide an easy means of excluding oxygen from the air around the firing billet, but, again, I found commercial kilns far too clumsy to operate when creating mokume gane for my individual needs. For this reason, I developed a very inexpensive and serviceable kiln using two standard-sized, soft-fire bricks. These bricks, known as K-23 insulating fire bricks, are available from ceramic suppliers for a few dollars each.

Soft-fire brick mini-kiln.
The kiln itself has four main parts:
1. The firing chamber.
2. Burner port.
3. Spy hole and secondary burner port.
4. Recess for the clamp.
The largest billet I make in this kiln is approximately 1 1/2" x 2 1/2"; I find a spherical 3-inch chamber located in the center of the kiln (each brick contains half of the chamber) to be quite adequate for this. You can make the chamber larger or smaller, depending on the size of the billets you plan to fire, and the cavity may be somewhat elongated by carving the inside to allow adequate clearance for the billet assembly.
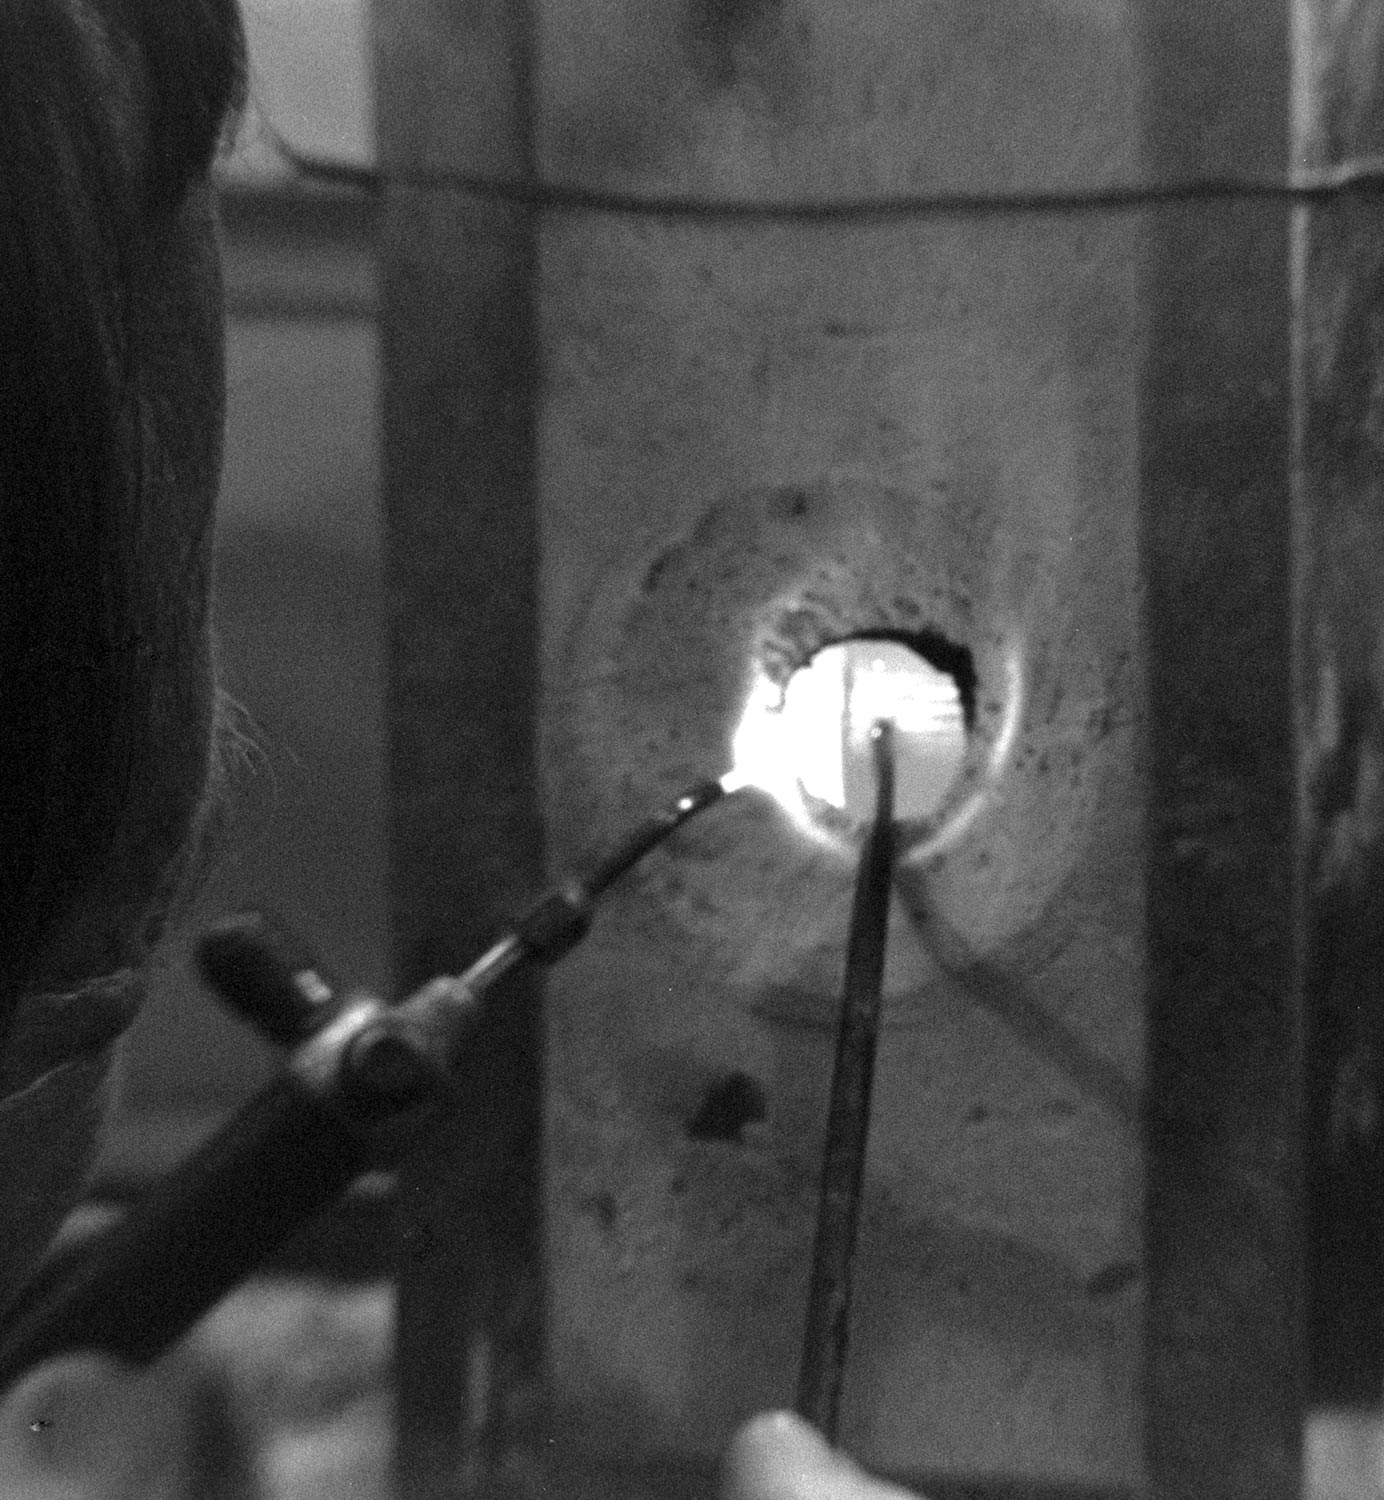
The burner (torch) port is drilled through one brick toward the bottom of the chamber and situated in such a way that it and the spy-hole, together with the spherical chamber, allow an even circulation of the flame from the torch. The spy-hole itself is drilled in the front section of the kiln (the brick without the burner port), a little above the center-line of the chamber, and beveled inside and out so as to make viewing easier.
The recessed area that accommodates the C-clamp should not be carved until you have bought the clamp. Do not skimp on this item, since failure of a C-clamp during firing can ruin hundreds or even thousands of dollars worth of metal. I now use a 4-inch heavy-duty drop-forged C-clamp available through industrial tool and welding suppliers.
To carve the insulating fire-brick, I prefer a sculptor’s clay loupe tool, but just about anything will work on this soft material. Take care not to put too much pressure on corners and thin places, as the brick breaks easily; and keep it flat on a smooth, clean, surface to support it as you work.
Using a pencil, lay out the location of the chamber and clamp on both bricks and begin carving. Once the chamber is complete (each brick contains half of the spherical chamber), carefully carve the fire brick so that the clamp will lie into a matching recess carved into one of the bricks. To carve this, I use a linoleum knife and coarse files. Position the C-clamp over the brick and redraw your lines, if necessary. Keep in mind that the handle of the clamp used in tightening should extend through the top of the bricks, while the body of the clamp will come out the side, between the two bricks. This is desirable because the cooler outside air will keep the clamp temperature down during firing, and thereby maintain its strength and pressure on the billet.


The fit of the clamp into the recessed area should be as snug as possible, but not so tight as to inhibit removal of the clamp from the kiln. Don’t worry about small gaps between the clamp and the brick. During firing, the pressure of the burning gases inside the kiln will push out of these gaps and keep any oxygen from outside the kiln away from the metal. The object, of course, is to locate the clamp mouth, which will hold the mokume billet, in the very center of the chamber formed by the two bricks. When one brick is finished, mark out the position of the other side of the clamp on the other brick and carve it in the same fashion. The easiest way to do this is by placing the clamp into the finished side, then place the other brick on top of the clamp and wiggle it back and forth a bit. The clamp will make marks where it contacts the brick and show you where you should carve. By going slowly and repeating this procedure throughout the carving process, you can achieve a very snug fit.
When all of your brick work is finished, it is best to bind the bricks in some way to help hold them together. This can be done, in a pinch, with two or three strands of steel wire or a couple of long hose clamps wrapped around the circumference of each brick. For a more permanent and more protective binding, your local sheet metal shop can fabricate a frame of galvanized steel for very little money. Make the frame about 2 1/8" deep so that the brick extends 3/8 inch above the top edge. This will allow the clamp to be fully recessed into the brick without touching the frame. Any gap between the brick and metal frame should be filled with a thin mixture of casting investment so the brick will be fully supported by the metal. Filling this small gap will be much easier if you moisten the brick before pouring the investment. I prefer using a kiln with this kind of frame, which is much sturdier and will greatly extend the kiln’s life.

Modified drop forged C clamp.
As for the clamp, you need to make slight modifications. The side of the clamp mouth connected to the body of the C-clamp has a greater mass and will absorb more heat than the adjustment screw side of the clamp. Also, without some extension to this side, the billet will not be positioned in the center of the chamber. It is necessary, therefore, to add an extension piece to this side. This can be accomplished by welding a piece of steel rod or a bolt to the inside of the upper clamp mouth, or even just inserting a loose 1-inch long by 1/2-inch bolt with nut between the clamp mouth and the billet assembly. What I prefer is to tap that side of the clamp and use a 2 1/2-inch long by 1/2-inch machine bolt as another adjustable element of the clamp. In that way, you can always make sure your billet is optimally positioned in the chamber.

You will also need clamp-plates between which to sandwich the billet. You can make several pairs of these from mild steel or, for plates that are stronger at high temperatures, use high-carbon steel or moly-bearing stainless steel. They should measure slightly larger than the intended billets, from 3/8" thick for very small billets to 1/2" for larger ones. Check them for flatness every time they are used, as they will deform under the heat and pressure of the firing process; regrind or replace them as necessary. The only other tools you’ll need for my mini kiln method are two pairs of regular Vise-Grip pliers and one Vise-Grip locking C-clamp.
Pre-fire Prep for the Mokume Mini Kiln

Begin by carefully stacking the cleaned metal, paying close attention to the proper order. Make sure the surface of the sheets remains clean. When they are stacked and the sides are squared up, firmly squeeze the stack tightly with one hand (it’s okay to touch the outside pieces now), and with the other hand, apply a band of cellophane tape completely around the edge of the billet stack, as shown in the photo. Fold any excess tape over onto the top and bottom sheet. This not only temporarily holds the billet together, but also protects the edges from becoming dirty during the clamping process. Now, put it aside in a clean, tucked-away place while you prepare the clamp-plates.
From your selection of clamp-plates, select the pair that best suits the size of your billet stack. Check it for flatness and paint the faces that will hold the billet with a barrier coating of yellow ocher, or Scalex. This will act as a separator and keep the metal in your billet from fusing to the clamp-plates. Then set them aside to dry. You may also use typewriter correction fluid or sheet mica for this purpose. I prefer a combination of a paint-on separator and mica. The mica allows you to paint on the flux with no risk of contaminating the metal stack with the yellow ocher or Scalex. Later on in the firing, if the mica begins to burn away, the scalex or ocher is still there. For high-temperature firings like platinum billets, I use all three! At any rate, do whatever it takes to make sure the billet does not fuse to the clamp-plates.
Then, take the kiln C-clamp and loosen the ball-joint swivel on the adjusting screw and the screw itself. These will be stiff from the previous firing. Apply a drop of oil to both points and work until they turn freely.
On a fireproof pad, place bricks (any kind will do) on which you will set the kiln when loaded. Make sure these are in position so that the kiln will be oriented properly for your torch.
The excess tape that has been folded over the top and bottom of the billet now needs to be carefully trimmed away with a sharp knife. Make sure you leave the tape that is still covering the edges, as this will be removed later.
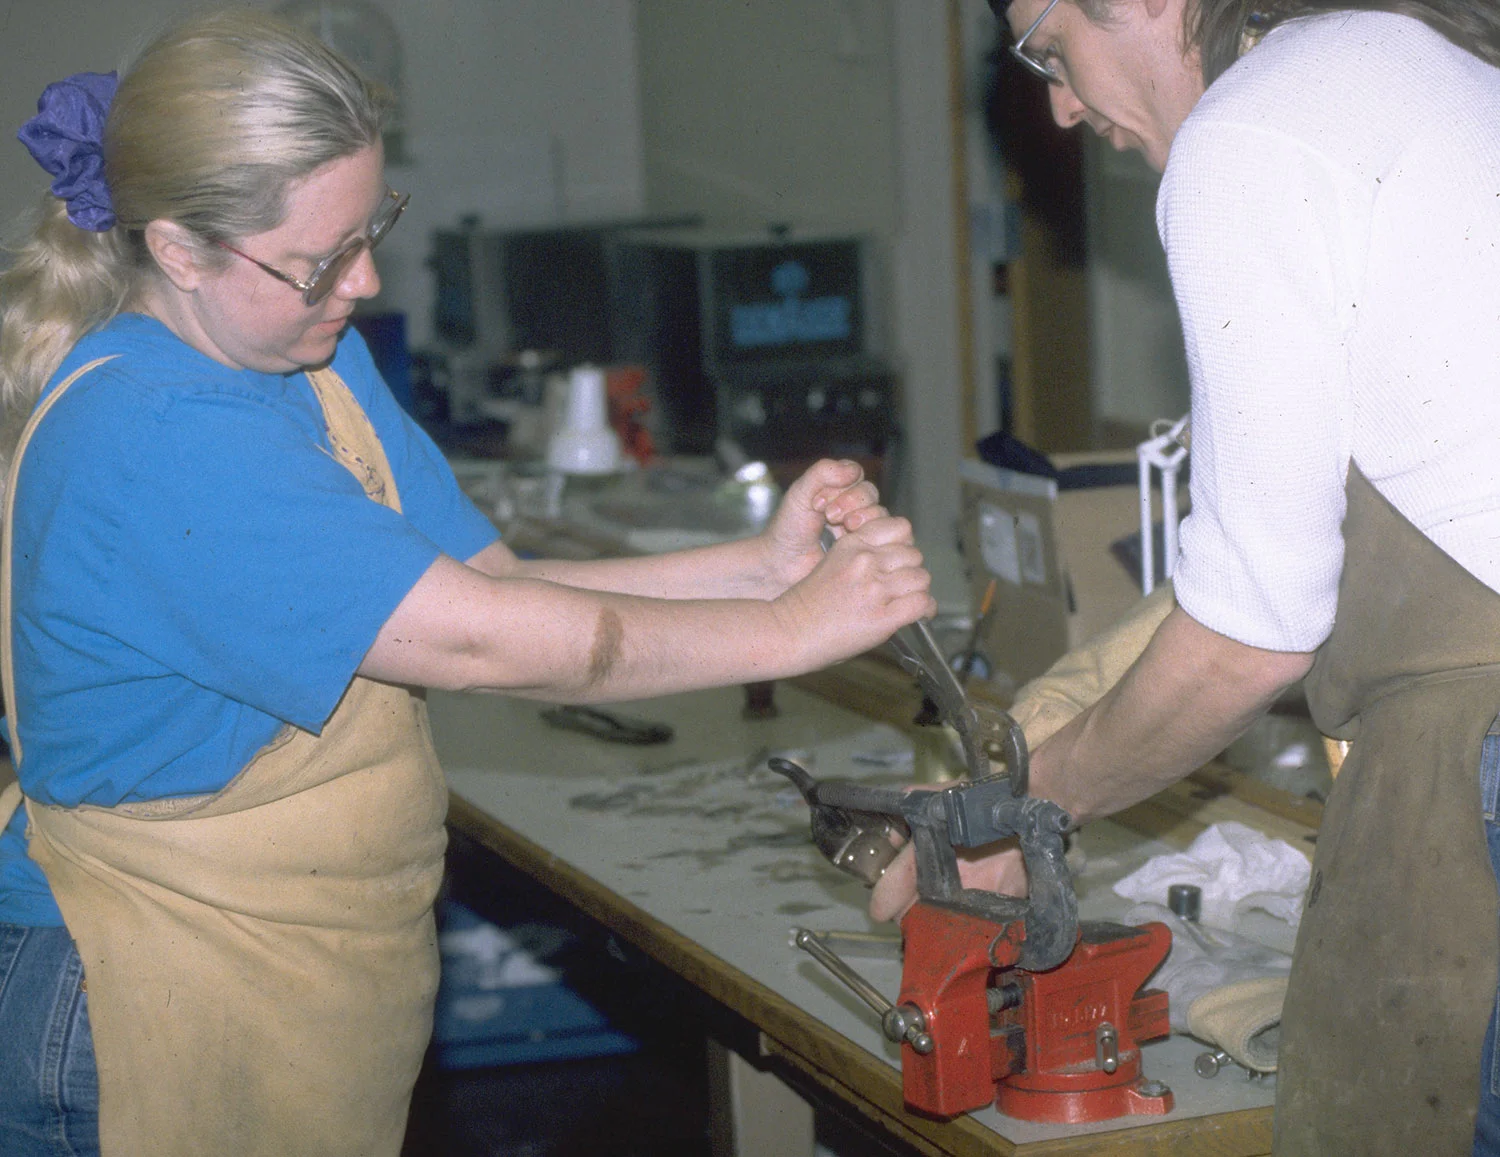
Next, take the billet-stack and place it between, and in the center of, the two clamp-plates. Pinch the whole clamp-plate billet-stack assembly firmly with one hand and with the other, take the Vise-Grip C-clamp and very tightly clamp it in the exact center of the assembly.
Note: Alternately, if you have access to a hydraulic press, you may use it to smash the billet layers together prior to clamping. This will help achieve greater contact between the layers, but is not absolutely necessary.
Adjust the two other regular Vise-Grips and simultaneously clamp these to either end of the assembly with firm but even pressure. Make sure the pressure is even on both ends or this can deform the metal in the billet stack. Release the Vise-Grip C-clamp in the center.

Now it is time to clamp the whole billet assembly into the kiln C-clamp. First, check the level of the top adjustable clamp-bolt (if you have added one to your clamp) to make sure the billet will be properly centered in the chamber and in good view. Place the billet assembly in a vise to hold it steady. Then tighten the C-clamp onto the center of the billet assembly. I tighten as hard as I possibly can by hand and then use pliers for another half turn. (It is important to tighten the clamp enough to create flexing in the clamp, so that as the billet fires, and softens, it will retain positive pressure on the metal.) Now, if everything looks good, release the two vise-grips simultaneously and remove this whole contraption from the bench vise. Inspect to make sure that the billet stack has not changed position (sometimes it twists), and check that you can see no gaps between the layers. Then, carefully remove the rest of the tape on the edges of the billet.
It is at this point that I would carefully apply a generous coating of borax paste flux to the edge of the billet stack. This, I have found, protects the edges of the billet from contamination during the firing process and reduces the amount of metal that must be trimmed away later on. For the first couple of firings, you may wish to use no flux. It is very easy to mistake the shine of molten flux on the side of the billet for telltale signs of sweating. Try a couple of firings without the flux until you get a sense of the quality of the glow the metal has at fusing temperature. Then move on to using flux.


The clamp assembly may now be loaded into the kiln. It is important that the billet assembly be fired in level position. Do not fire the kiln with the billet layers perpendicular to the ground. If the metals reach the completely liquid eutectic point, this thin, molten layer of metal can act as a lubricant and the sheets can literally slide out of the clamp assembly.
Both halves of the kiln are now aligned and bound together with a couple of light steel wires. Set the kiln in place and position your main burner torch so that the tip of it is about 1/4-inch from the outside opening of the torch port. You can make a special torch-holder or use Vise-Grips to build a temporary one.
Firing the Mini Kiln
Firing requires your full attention, so make sure you will be undisturbed for at least 30 minutes and can concentrate exclusively on the firing. Once you begin the firing, do not turn off the torch until the bonding is complete. To do so would allow oxygen into the kiln and contaminate the metal. So, unplug the phone, turn off your beeper, chase out the kids, and tell your significant other to keep a significant distance away!
Light your hand-held torch first and use it to light the main burner torch. Keep this flame directed at the main torch until you have both the gas and oxygen turned on and adjusted to a reducing flame. (A reducing flame is one which has a yellow tongue coming off the inner light-blue tip, at the center of the flame.) The yellow should be clearly visible but the flame should not be sooty. Keep close tabs on the flame during the entire firing. Some gas and oxygen regulators will change pressure slightly while in use and this change can be enough to shift the flame from slightly reducing to slightly oxidizing, which could be disastrous. Billets containing platinum should be fired with a neutral or slightly oxidizing flame.
Caution: Do not allow the chamber of the kiln to fill with gas before lighting, as this can cause an explosion. When firing, always wear glasses or visors to protect your eyes from UV rays.

First Stage
The initial stage of firing is for steadily and evenly raising the internal temperature of the kiln. If you are using two torches (which I highly recommend), adjust them to work together to keep the chamber heated as evenly as possible. Hand-hold the second torch so you can easily change its position to heat up the colder areas of the chamber. If you are using just one torch, keep an eye on the hot spot opposite the torch-port where the flame bounces off the wall of the chamber. Try not to let that side of the billet stack assembly get too far ahead of the colder side. This will probably require cutting back on the flame size as you reach visible red heat.
Second Stage
The second stage of the firing sequence takes the billet-stack assembly from visible red-heat to bonding temperature. Watch the color of the metal to determine hot spots and keep the temperature of the billet stack as even as possible. Remove the flame of your hand held-torch occasionally, so its light does not distract and hide the first sign of glowing metal in the kiln.
Remember (especially those of you firing with one torch only), the hottest part of the kiln is the corner farthest from you, where the primary torch flame bounces off the chamber wall.
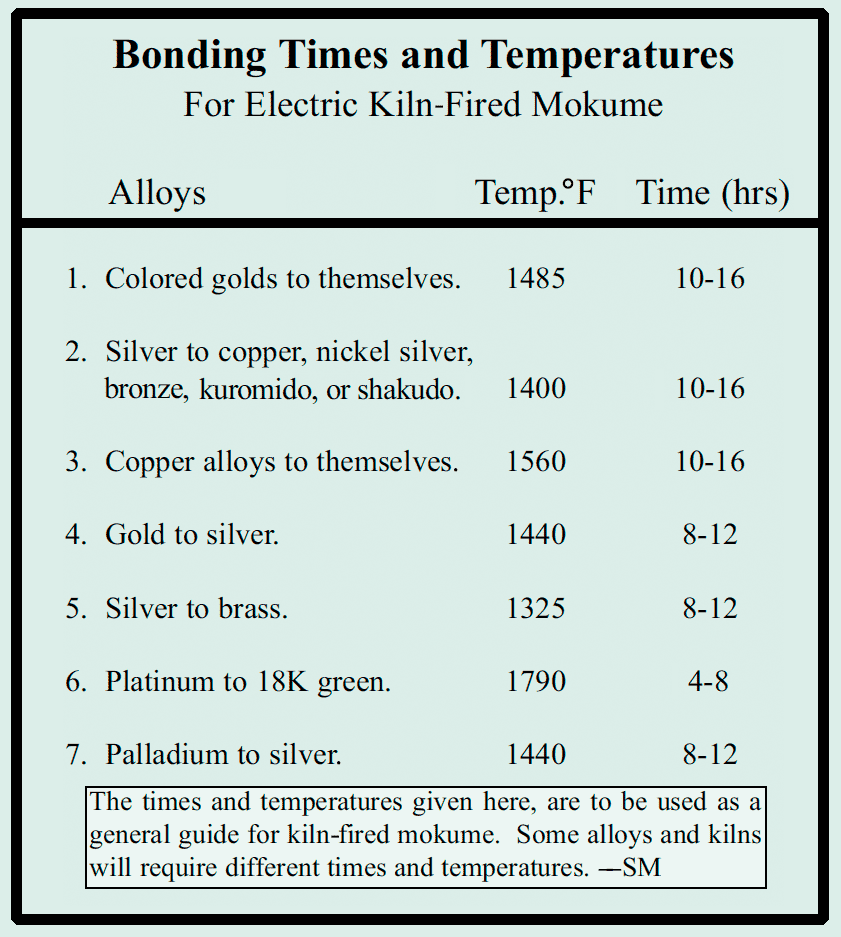
This chart gives time and temperature for for electric kiln-fired mokume, from Chapter VII part 3 and is offered here for comparison only.
You may wish to use the pyrometer from your burnout kiln to keep track of the internal temperature. However, the thermocouple will heat much more quickly than the mass of the billet, so you need to watch the color of the thermocouple in relation to the color of the billet. You do not have to use a pyrometer. You do need to know the signs that indicate when bonding is taking place.
Listed below are some internal kiln colors and corresponding temperatures to use as a general guide for visually estimating when bonding temperature has been reached. Estimating temperature by color is a subjective judgment at best, and depending on the exact alloys in the billet, actual bonding temperature will vary. If an alloy contains more copper or zinc than another listed here, the bonding temperature will be lower. If it contains more palladium or nickel, the associated bonding temperature will be somewhat higher. Use these as a guide for Liquid-Phase Diffusion-Bonded (eutectic) mokume only, and watch for the other signs I give you.
Mini-Kiln Color Estimates and Temperatures
18KGr. gold and shakudo — med. orange —1540° F.
22 KY and Shakudo — med. orange — 1550° F.
18K Pd White gold and shakudo — medium to bright orange — 1675° F.
18K Pd White gold and 18KGr. — bright orange — 1800° F.
18K Pink gold with 18K Gr., Y, or Pd W — medium orange — 1570° F.
Silver with shakudo, copper or nickel silver — red orange — 1432° F.
Silver and brass — red — 1375° F.
Sterling with palladium or 18K Pd. W. gold — medium orange — 1490° F.
Shibuichi with shakudo or copper — red orange — 1432° F.
Brass with copper or nickel silver — very bright orange — 1830° F.
Platinum and 18KGr. — very bright orange — 1810° F.

Make every effort to even out the heat in the kiln. Go slowly for the first few firings until you get a feel for the firing process. As the billet begins to glow, you should be frequently scraping the edges with a sharp steel probe. Scratch parallel to the layers, and also across them. This will actually drag small amounts of one metal across the surface of the other(s) and it will be there that signs of sweating can first be observed. When you believe you are at bonding temperature, there are several signs to look for. They are given below in order, from the most obscure, to the most obvious:
1. The shimmer of visible sweating where the metals meet, when the edge of the billet is scraped with a sharp steel probe.
2. The shimmer of visible sweating where the metals meet, when a corner or section of the billet is heated locally by your second (hand-held) torch.
3. The shimmer of sweating on the edges of the billet.
4. Beads of hot metal popping out from between layers like beads of sweat.
The signs listed below indicate the temperature has gone too high. Turn off oxygen only and cut back gas. Reduce soak time according to how much you judge the piece has been over-fired, but do not turn off the gas until the metal completely solidifies.
5. Partial melting of the whole edge of the billet, or of a single sheet in the laminate.
6. Liquid metal flooding over the entire side of the billet.
7. Collapse of the billet stack.
8. Hey! Where is my billet and what’s that burning smell?
You would be surprised at how little temperature (and time) difference there sometimes is between #1 and #8. But let us assume that you are somewhere between #1 and #4. What should you do now?
Third Stage
This is the third or “soak” stage of the firing. When you are sure that bonding temperature has been reached, cut back your torch(es) so as to maintain the temperature slightly below (maybe 20°) what it was when you first observed the sweating. Maintain this temperature for five to ten minutes, depending on the size of your billet, and your observations of any continued sweating. This soaking is to make sure that the entire billet has the opportunity to reach diffusion temperature, and to promote the growth of the bond. This is quite a delicate stage and one that, unfortunately, only experience will fully illuminate.
After you have soaked the billet, turn the torch oxygen off, leaving the gas on. Let the billet cool in this manner for half a minute or so, allowing it to slowly and completely solidify.
Fourth Stage
The final stage of the process must be accomplished quickly and with great care while the billet is still red hot. Wear insulating gloves! Turn the kiln down flat on its back, snip the binding wire and remove the front (now top) half of the kiln. With pliers or other grasping tool, remove the clamp assembly and secure the back of the clamp firmly in a heavy bench-vise located near your anvil. Carefully loosen the clamp and remove the billet and clamp plates. They will probably hang together at this point but they may separate and fall to the floor, be careful!
Place them on the anvil and tap with a hammer to loosen the clamp plates if they are still attached, then quickly forge the billet in a circular pattern spiraling from the center of the billet outward. You may also use a hydraulic press or even a bench-vise for smaller billets to achieve this forging. This process enhances the bond as well as the grain structure of the metal. After forging, quench in cold pickle at the appropriate temperature for the metals you are using. Preparing the billet for patterning begins in Chapter IX, Patterning.

NEW LAYERS — WHAT WE’VE LEARNED SINCE
This post of the first section of the Firing Methods chapter is dedicated to economical, small-scale, mokume bonding techniques. In this New Layers section, I’ve shared what I’ve learned about that process since I first wrote the book. I’ve also invited Eric Burris of mokumeganeworkshops.com to share his preferred techniques for laminating a mokume billet with his mini-furnace. Be sure to check that out a little further down.
Improvements to Torch-fired Mini-Kilns
I used the mini-kiln described above exclusively for firing my mokume billets for years. As I started working with different metals and larger billets, I incorporated other methods to take advantage of digital electric kilns that offer high levels of temperature control. However, I still find the mini-kiln indispensable, and for me it is an old trusted friend. I like how quickly it heats up and that the whole process can be finished in about a half hour. I find it particularly good for laminating metal combinations that do not have a eutectic point, or alloys with a high differential of melting temperature between the other metals in the stack, e.g., platinum, palladium and palladium white gold. Combining layers of silver/gold, silver/copper and silver/zinc alloys are trickier because their eutectic or melting temperature is much closer to the bonding temperature.
While I still use the same basic style of mini-kiln, I’ve made some changes that have improved its performance. I now use a larger, stiffer, drop-forged C-clamp. Be sure to buy a high quality welder’s clamp for this. Cheap cast-iron clamps from big-box stores won’t do the job. I very much like that the tension on the billet is provided by the body of the clamp that is outside of the kiln, which stays cool and does not loose strength. This keeps the tension constant and you don’t have to worry that the bolts holding torque plates may relax and stretch during the firing. I have also invested in Inconel (718) adjusting screws, pads, and clamp plates that do not deform during the firing process. I suggest checking on Ebay for surplus Inconel plates, bolts or threaded rod that can usually be bought at a substantial discount there.

Better, stronger C-clamp that Steve now uses.
What I love about this firing method is that I can cut the metal very precisely, fire it with the edges protected by flux in a protective reducing atmosphere and basically just lightly scalp the edges when it’s done. Because the bonding is good right up to the edge, there is no need to saw off the edges of the billet. I just even-up the edge surface with a file or big bur to remove any excess or drips of melted metal. I used to scalp it all the way down to where you can clearly see the distinct layers of metal and then solder them back over with an appropriately colored hard solder to protect the edges when forging or rolling. Now, depending on the alloys used in the billet, I may just flux and carefully re-fuse/re-flow the metal that is already there from the firing with a hot torch flame to spread it evenly over the side of the billet (this is not recommended for copper alloy billets). I use a tungsten TIG electrode to help push this metal around on the edges of the billet to cover the whole edge.
After pickling, lightly file or sand off the high spots and start rolling. My billets never delaminate from flux getting trapped inside between layers of metal, because 1) the layers were firmly clamped together before applying it, and 2) as the billet heats and the yield strength of the billet metals decrease, the tension in the C clamp squeezes out any small amounts of flux that may have wicked up into the billet. It will take a while to build your skills and really get the feel for firing billets by this method, but if you stick with it, it offers a great way to produce top quality mokume quickly with a minimal investment in firing equipment.
Note also: I no longer forge the billet immediately after the firing as it’s just a bit too hectic. Usually, I carefully remove it from the clamp, cool to black heat and then quench in pickle. If I want to hot-forge the billet, I do so after soldering/re-fusing the edges.
— Steve
Eric Burris On Torch-Fired Mokume

Eric Burris. Photo by Gretchen Schermerhorn.
I learned about making small-scale mokume gane using Steve’s refractory brick kiln method. His kiln consisted of two large, soft, refractory bricks carved to accept a modified C-clamp with a 3-inch diameter chamber. The C-clamp holds two steel plates with the cleaned and stacked metal sheets. All of that is held in place and centered in the interior chamber when the bricks are put together. There is a torch hole in the back brick and a view hole in the front. A soldering torch was needed to fire a billet of 1 x 1 inch sheets, 14 layers of 18-gauge copper and sterling silver. The firing time was approximately 30 minutes, and it was easy to see details inside the contained bricks. It worked great, but it soon became apparent to me that firing a lot of billets meant making new C-clamps. The modified C-clamp was a 3-4-inch steel clamp with the top portion tapped and threaded to insert a bolt to hold and tighten metal for a billet. Steel plates were used to help compress and stabilize the stack. [This setup is from the book and shown above.]
A Kiln Design without a C-clamp
With each firing, the clamp would become weak and flex as it was tightened for each new billet. Instead of making new clamps I thought it would be better to use bolted torque plates. With the bolted torque plates compressing the stack, the C-clamp’s only job became to hold the stack in the center of the chamber.
This modification started a process I still think about today: to develop a low-tech, low-cost, and efficient method for making mokume gane — a predictable and repeatable method that can be successful in any modest studio. The most radical change I made was to the original brick kiln design. Eliminating the C-clamp meant that the interior chamber would need to be changed. It took a few designs and lots of tweaking to come up with the mini-furnace I currently use in my workshops.


I use one brick instead of two which makes the furnace more compact and easier to use with a soldering torch. It has a base, main body, and a lid with handle. The main body has a view-hole, torch-port, and a 3-inch diameter round chamber. It can be lifted off the base for easy access to a fired billet. There are two round risers, one short and one tall. The short one can be used inside the firing chamber to elevate the torque plate assembly for ideal viewing. The tall riser is used to prop the torch in the torch hole. Since refractory brick expands with heat and contracts while cooling, it’s held together with steel binding wire. It also makes a good environment for annealing, and could possibly be used for torch-fired enameling.

Speed Cleaning
Another way I made the process more efficient was to speed up the cleaning process. In Ian Ferguson’s book, he references a jig used to hold a piece while being sanded. I took his idea and made a cleaning jig for two pieces of metal: I riveted thin-gauge brass with two cutouts to a wood block. The cutouts are slightly larger than the metal sheets and hold the metal securely while cleaning. A side benefit of the jig is that it alleviates hand fatigue, which matters when cleaning small pieces of metal for several billets. I wrap and screw Scotch-Brite pads around wooden blocks to further make the cleaning process easier.
I also now use citric acid, a much more environmentally friendly chemical, in the holding bath for the metal instead of isopropyl alcohol. Again, I was thinking about keeping the process low-tech, low-cost, and efficient.
Metals
Copper and silver make for a friendly mokume combination. They are familiar metals and the cost is low for a small billet. Because the bonding temperature is relatively low for copper and silver, it fires quickly in the mini-furnace, about 20 minutes. This is long enough to see the visual clues necessary to diffuse the layers, but not too long to waste torch fuel. This combination makes a workable billet when properly annealed, so reduction goes quickly. A small billet of thin-gauge metal and a few more layers yields a detailed pattern without being too fine. There's a strong contrast between these two metals, especially if a copper patina is applied.
Note that copper and copper-alloys for a billet (copper, brass, nickel-silver) are much lower in cost, but more problematic. Higher bonding temperatures make it difficult to see inside the mini-furnace, because the steel and stacked metal is bright orange instead of the medium-red of copper and silver. More problems occur with these combinations, especially incomplete bonding.
Pressing the Billet
Several years ago I added a 20-ton hydraulic press to the process. Maximum compression is needed to minimize the spaces between layers of the metal stack. I made steel spacers so that the torque plates can be compressed and bolts tightened, all the while in the press. Recently I’ve observed that a torque wrench is just as effective. Using dead-soft copper and silver makes it possible to get adequate compression with the wrench, but high grade hardware must be used to avoid shearing. Thicker gauge or harder metals may require the press. It is nice to have the hydraulic press for “setting” the billet after firing, but this can also be done with two hammers and a partner.

Patterning and Other Tips
For me the most exciting part about mokume gane is patterning. Each pattern is unique even if the same technique or tool is used from piece to piece. A drill bit or ball-bur will make a concentric circle pattern while a cut-off wheel or wheel-bur will make a linear pattern, and combining them will yield something entirely different.
A free-standing drill press with a stopper is very efficient and can be used to achieve the same depth with each plunge. I recommend forging the billet in between patterning sessions. After two or three rounds of drilling, deburring, and forging, I use a rolling mill to get uniform thickness and flatten the patterned surface.
Fabricating with a patterned sheet is similar to working with sterling silver, except that solder is used. Take care to not overheat the sheet, and I recommend easy and medium solder. Most of the mokume in my jewelry is joined by cold connection using rivets, tabs, or bezels. This way I can finish the mokume element and give it the desired surface treatment and patina. When the rest of the piece is finished the two can be joined and then waxed. I try to avoid repeated heating and pickling of copper and silver mokume. If the piece is small and thin, it is very easy to overheat the piece and damage the pattern. And leaving a piece in the pickle too long will etch away the copper layers.

Patterned sheets by students at one of my workshops.
Note also that copper and silver is not the best combination of metals for jewelry in direct contact with the skin, especially rings. Our sweat, along with handwashing and contact with other chemicals in our environment cause the copper layers to etch away. However, I feel it's the best combination of metal for learning the diffusion bonded mokume gane process.
— Eric Burris
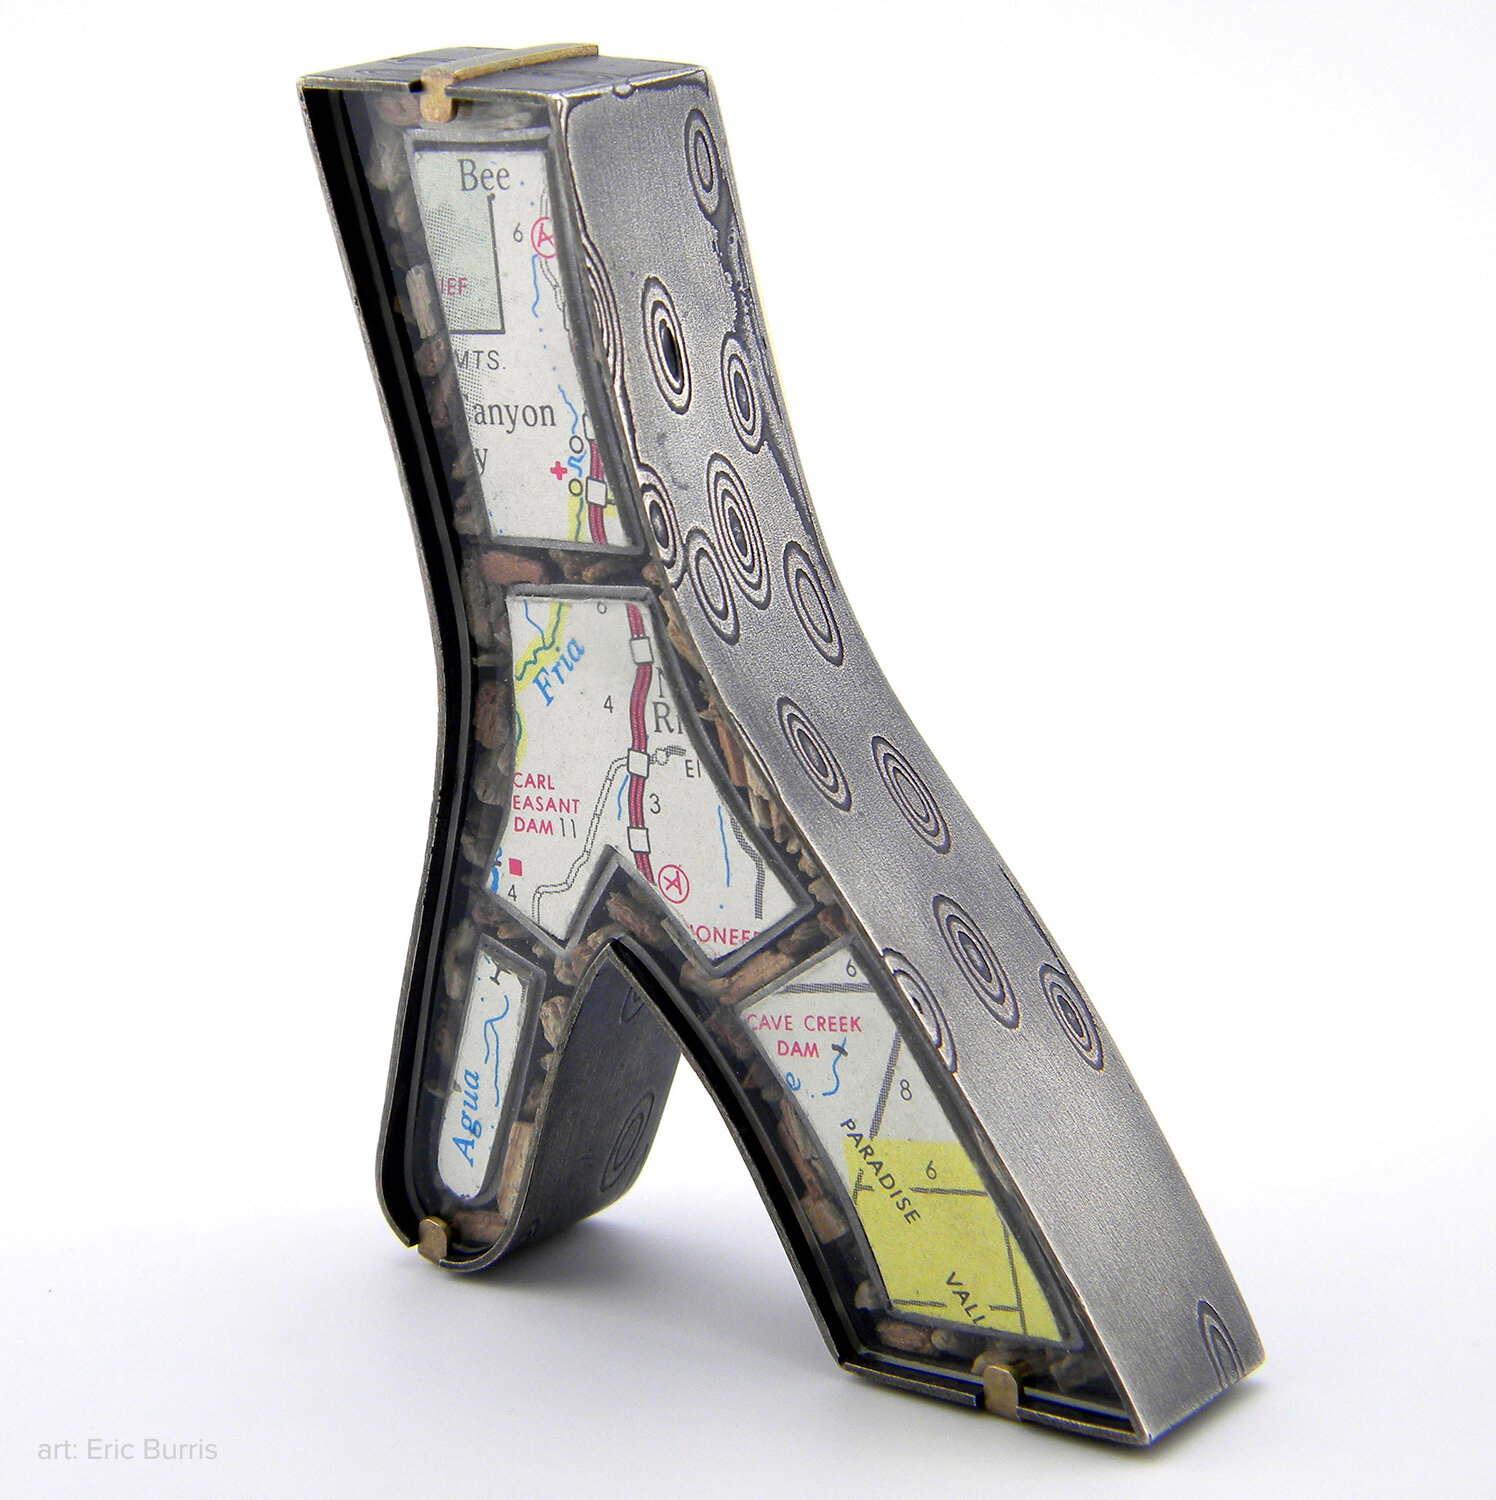
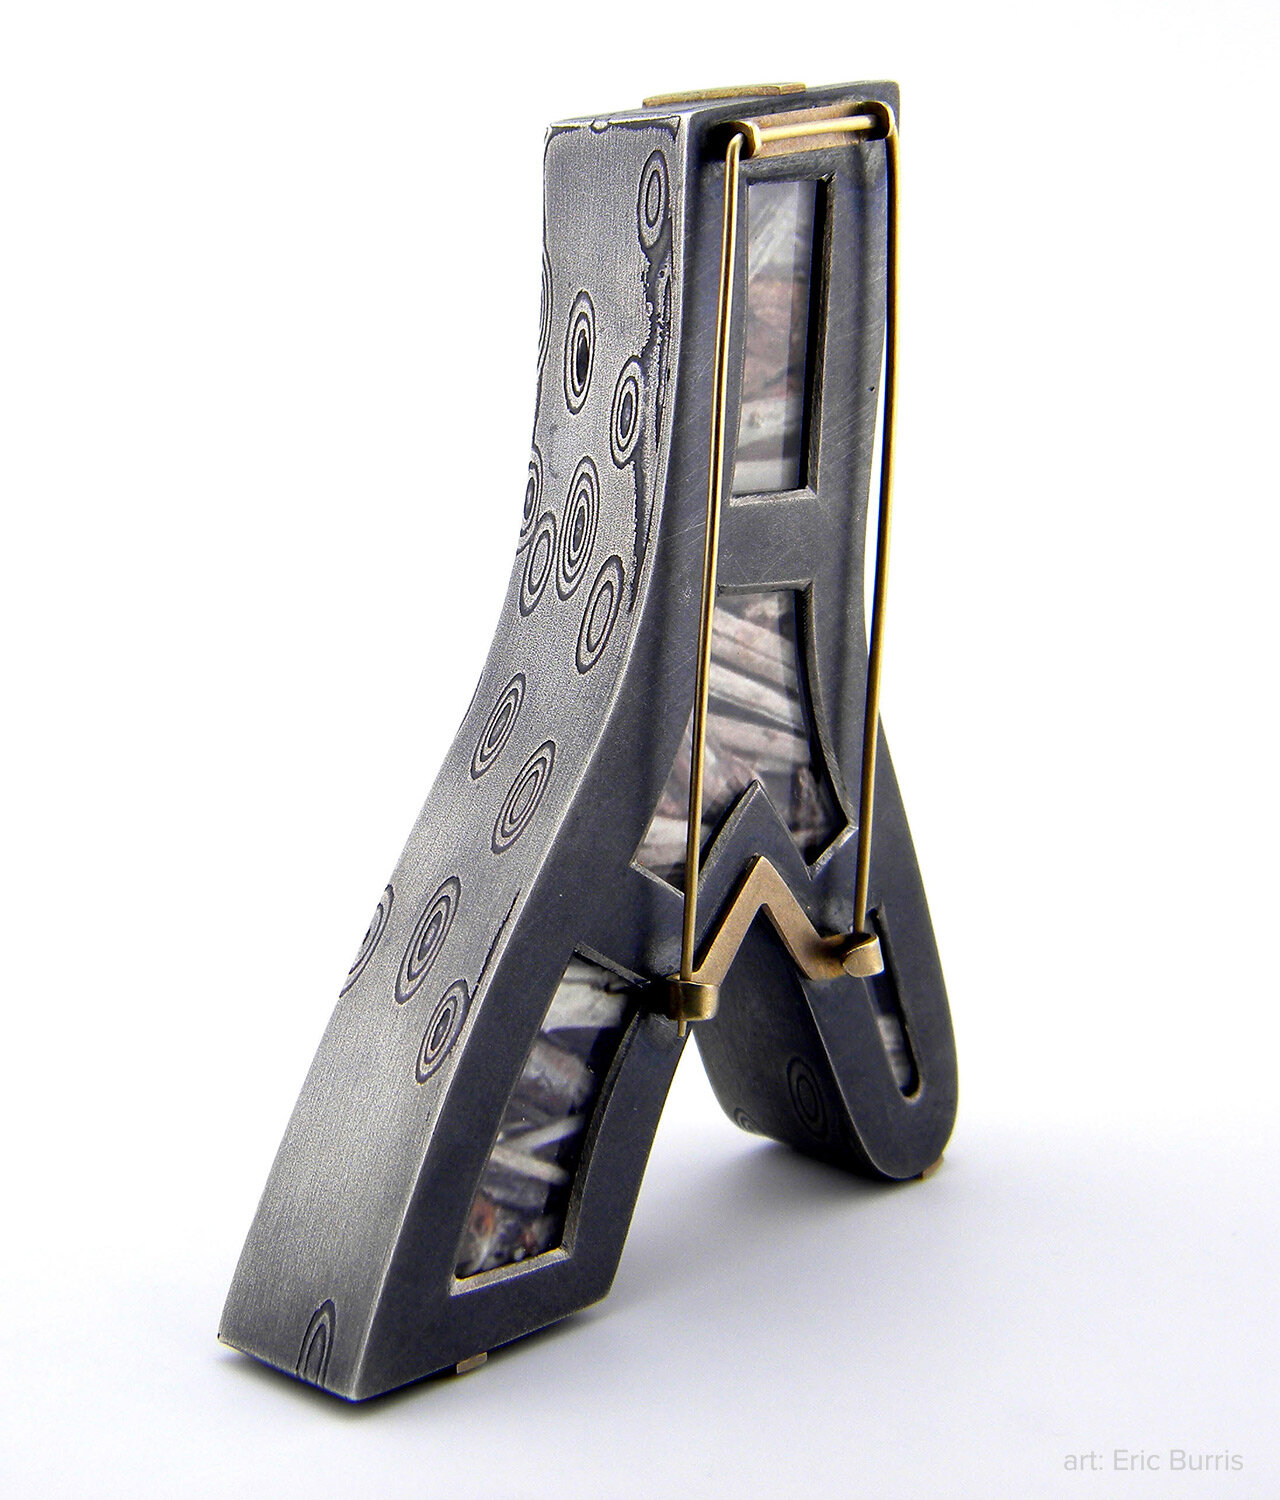
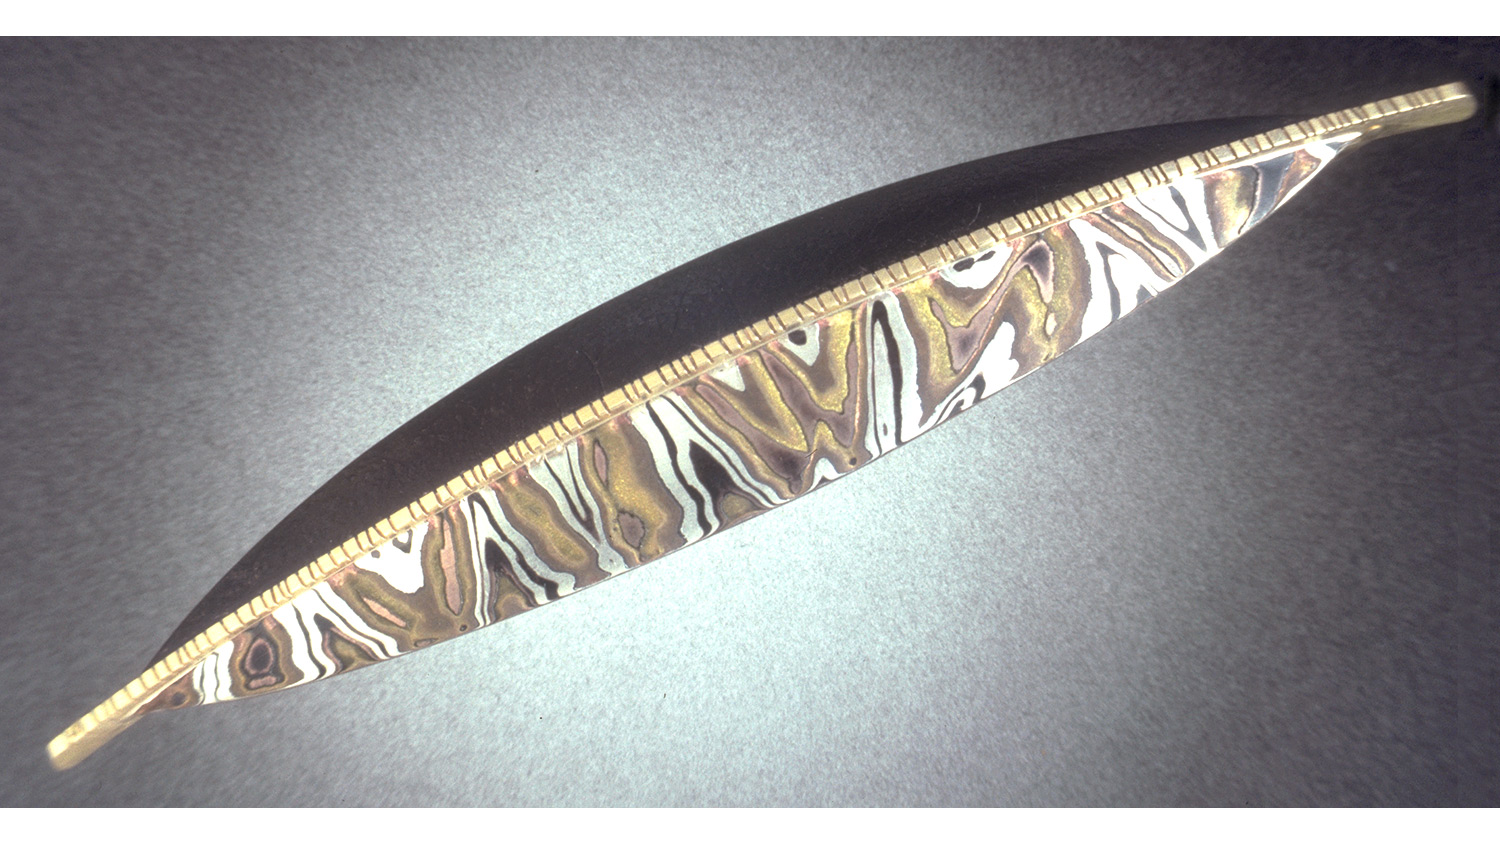
“Agua Fria” Brooch By Eric Burris
FROM THE BOOK’S GALLERY
©2000-2019 STEVEN JACOB INC. All rights reserved. Copyrighted materials – no portion to be reproduced without written permission from STEVEN JACOB INC.